How to Prep Reclaimed Wood for an Accent Wall
Don't let your old wood get to waste and turn into a beautiful piece! In this guide, you'll learn how to prep your reclaimed wood and turn into an accent wall, what items you'll need, and where to get them.
Step 1: (1 hr)
Measure your wall and determine how many square feet of material you need. Compute A x B = total sq. ft.
Example: Wall is 7' wide (A) and 9' tall (B). multiply the two numbers. 7'x9' = 63 square feet of wall space to be covered. Now make sure you account for waste, so multiply 63 by 15% = 10sqft (extra needed just in case).
When measuring in inches, compute A" x B" / 144 = sq. ft.
Example: (88" x 165") / 144 = 101 square feet total. x 15% (waste accountability) = 15sqft (extra needed just in case).
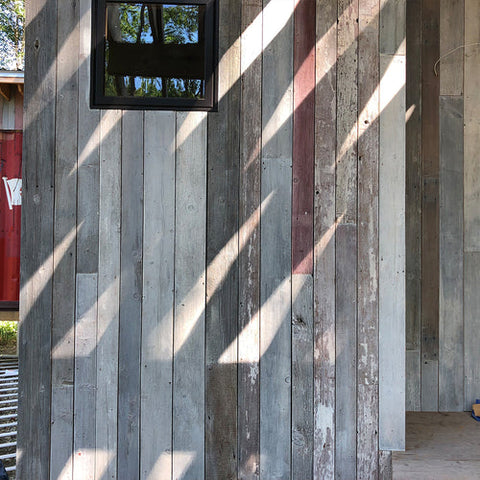
Now choose the style and design you'd like.
 Horizontal?


Step 2: (1+ hr)
This step takes one hour or more depending on the size of your material. Gather the raw barn wood and sort through to grab panels that are suitable for the style you'd like. For example, if you don't want any pieces that are too smooth or too red, set them aside.

Step 3: (1-3 hrs)
Material coming straight from a barn is unpredictable. Some have hardware still attached, some have more old nails than the others. The time spent cleaning it up depends on each piece. We do a thorough check because it is unsafe and costly to put any material with nails, dirt, debris into any equipment. Jointer blades can get pretty expensive $80+, and sharpening $40-$60 each time. You can certainly purchase cheap $20 blades, but will quickly notice the low quality.
When seeking precision (especially on the jointer), please be careful purchasing low-grade blades. Nails can chip the blade and causing the jointing process to be unsuccessful. Dirt, debris, and unknown substances can dull the blade quicker. In general, we like to take steps to maintain the longevity of our equipment and blades.
Going through each panel, use a wire brush to remove the excess debris (cobwebs, dirt, etc). Doing this first, you can clear the faces and spot the nails quicker. You can also use a metal detector. Different ways to remove nails: hammer and punch set; hand pliers or nipper; nail puller device; drill and bit to drill out the hole (mainly used when nails are sunken in larger material).


Step 4: (30-60 mins)
The labor hours on the jointer depends on the condition of the wood and how many times the edge needs to run through. On average, 40mins per 100sq. ft. This step will provide you with a new straight edge to work off of when you take it to the table saw. Using a miter saw, cross-cut the panels to a length that you're comfortable with handling dring prep - we do lengths 4'-8'.
You'll notice that some of the panels are warped, cupped, and twisted. It's difficult to get something square when it starts out so unreliable (naturally weathered to be exact). Regardless, always check that the jointer is square and ready to go.

The panel in the example below is somewhat cupped. It looks like the board forms in a "C" (long ways). Put the cupped face against the jointer fence. This is a more stable way to proceed since reclaimed wood is so unpredictable.

Jointers can be purchased at your local home depot or online. We mainly have Powermatic tools at this shop.

Step 5: (60-120 mins)
Rip barn wood on the table saw. Place the newly jointed (straight) edge against the fence. Remove one shiplap to get a new edge. Then, put the newly ripped edge against the fence, and rip the other shiplap.

Step 6: (60-120 mins)
Sometimes, clients like the two different widths aesthetic on their accent wall, rather than one large width slat. With this scenario, you can either provide one slat width of 6", two slats width split equally at 3", or perhaps 4" and 2".

Keep in mind when removing the shiplap, to have as little waste as possible.

Step 7: (60-120 mins)
Send slats through the planer. This will provide for all slats to be a consistent thickness. These slats usually start at 3/4" then plane to 1/4" or 5/8" thickness. The blades on a planer are on top. The face you want to keep, lay downward.

Utilize the slats to it's fullest potential with little waste. This is another route to go before you send slats through the planer. Resaw the barn wood on the bandsaw. This will let you keep the two faces. Each slat will come out to 1/4" - 3/8" thickness. To make sure that the thickness of your slats is consistent, run the newly resawn slats through the planer.


Step 8: (20-40 mins)
Bundle the newly prepped slats and add the label of square footage, width, color, and thickness.

That's it! You can now prep your own wood and use it as an accent wall. Watch our video How to Install a Barnwood Wall for easy steps on how to install them. Visit our website and check out our wide selection of barn wood.
For inquiries, call us at (312) 637-1923 or email info@chicagofabrications.com


